Saturday, 29 September 2012

Wooden Morgan: 1950 DHC - Week 5

It only takes a few seconds to ruin a week's work. 

This was the week to build the flat rad's flat radiator. Saturday I visited Stu to get a good look at his '53 flat rad 4 seater.  It turns out the sides of the bonnet are off from the vertical by 5 degrees.


This is enough of a slope to make the sides of the front parallel.  Some quick work with the plane and that was done.

I scaled down a picture I took perpendicular to the radiator to match the new width of the front. Then I traced it on some graph paper.


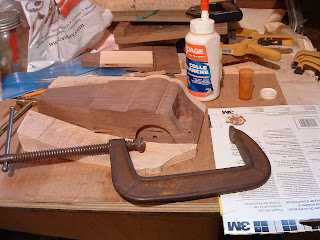
This left one last bit of bonnet shaping.  I transferred the radiator outline to the sloped front of the body and using the thumb plane, wood file and 80 grit sand paper got the bonnet flowing smoothly from rad to scuttle.


Next we need to find out how wide the bars and the gaps are in the radiator, back to algebra class.  The model radiator's grill width is 1 1/4". There are 15 slots and 14 bars in the grill.  The bars on Stu's grill are 3/8" and the spaces 5/8".  Therefore the ratio of bar width to slot width is 3:5.

We have two equations with two unknowns;

where:
    s = slot width
    b = bar width

1)    15s + 14b = 1.25
2)    b/s = 3/5 = 0.6

    Solve for s
2) ->    b = 0.6s
Substitute in 1)
    15s + 14 * 0.6s = 1.25
Therefore:
    s = 0.053418803...

And:
    b = 0.032051282...

So bars will be about 0.032" wide and the spaces between them about 0.053" wide.  To avoid accumulating rounding errors by measuring between each bar and gap I built a spread sheet to add up the many decimal place numbers to get the total distance to each line from the outside edge of the rad (which adds 3/16" for the side).  I rounded those numbers down to the nearest thou and measured them on the wood with vernier calipers.


 I picked up a magnetic saw guide from Lee Valley with a Japanese style Dove Tail Saw to cut the gaps.  Two cuts were needed for each gap since the saw kerf is only 0.031" while the gaps are to be 0.053".


 Four or five hours of sawing later (Hop Hornbeam is very hard and on the second cut the saw would easily slip into the first cut so light pressure was needed.) I got my grill.  The gaps look a little narrow but with some sanding to round over the front edges and black paint between the bars it should look OK.


 Blackened:


Then over to the band saw to cut the rad out of the block of wood.  And set the band saw at a 15 degree tilt to taper the sides and top to match the taper of the bonnet.  That would have saved a lot of filing time but since I forgot to lock the tilt I'll have to start all over again from the beginning.  It cut in too close to the first gap.  There is no room for the rounded leading edge.


Hmm...
- the bars are a little uneven.
- the saw kerf, 0.031", is only a thou off the width for the bars.
- in squaring the the stock I got a long tapered piece of the Hop Hornbeam that is thnner than that at one end so it is possible to cut radiator bars on the table saw.
- so if I use the dove tail saw to make slots in the top and bottom tanks and slip thin strips in as the grill bars...

Watch this space.

Friday, 21 September 2012

Wooden Morgan: 1950 DHC - Week 4

I started shaping the bonnet by cutting the two top edges with the 1/4" quarter round router bit.  There is a step at the back of the bonnet that is angled to match the windscreen so I made some dowels that will become the windscreen thinking they would act as guides while I cut the shape at the back of the bonnet.  You can see the spoke making jig in the 3 wheeler build on the Morgan Sports Car Club of Canada web site:
http://www.morgansportscarclubofcanada.com/images/farmer/New3Wheeler/jigs.html


I changed my mind on the guide and made something more robust from a scrap of 2x4.  Some shallow cuts with a backsaw pressed against the sloped face of the 2x4 made the step.  Then some shaving with the thumb plane and a chisel started to smooth the curve of the bonnet.  Finished the shaping with rasp and wood file.


Then sanded it with 80 grit.


After doing some more sanding on the body I realize it has to go to the body shop to repair a dent in the left door and a hole in the left rear.  The cheap Black Walnut I have is the core of the tree and the central ring has gone punky.


I drilled out the punk.


And made some Black Walnut dowels to fit.


Then glued in the dowels using a paste of white carpenter's glue and Black Walnut sawdust to camouflage any gaps around the dowels.


A spoon chisel and the thumb plane cut the dowels down flush and a little sanding smoothed them into the surface.  I'll ignore the big punk scar in the wheel well, it will be hidden by the wheel.


There has to be more shaping to the front of the bonnet, the radiator top is more round than the shape I have now.  It looks like I have to round it in to meet the rad but the drawings show the bonnet with straight lines from the scuttle to the rad.  If any owner of a circa 1950 Morgan has the solution for me drop a note to:
 morgansportscarclubofcanada@gmail.com

Meanwhile I'll turn my attention to the details, like cutting grooves for the side trim etc.  And I need to revisit the windscreen dowels, the ones I made for the repairs were far better than the one for the windscreen.

Saturday, 15 September 2012

Wooden Morgan: 1950 DHC - Week 3

Time to start making the block of Black Walnut look like a car.

With the templates I marked out the top and side profiles on the Black Walnut block. 
Then I located the centres for:
- the wheel wells and axle holes
- the door handles
- the petrol tank cap
- the wind screen pillars
- the tops and bottoms of the Trafficators
- 5 alignment holes on the wings to take small dowels to help when gluing on the wings.
- two rows of holes for the spare tire holder.


 Drilling the dowel holes along the bottom of the wing where it will be routered off after assembly.


The wheel wells; the rear ones need to be about 1/16" deeper than the front ones since the saw cut to remove the wing material goes through the rear wheel well but not the front one.  Thus after glue up the rear one will be shallower.


The spare tire holder, this had to be done in two stages as the drill press would not reach the required depth before it hit its stop.  I raised the table after the first set of holes were complete so the bit would stop 1/8" above the table, then slipped the work piece around the bit to compete the job.


I used the router to compete the wheel well openings.

A test fit confirms that the wheels are all square to the ground.


Minor disaster, I taped the 2x4 block on top of the Black Walnut block, marked the body outline using the template. Then started cutting the wings from the sides on the bandsaw. I stopped the cutting when the blade started to bend above the work piece.  The bottom end was not following the top and had cut a quarter inch further over to the inside.  Packed it in for the day.


Next day I checked the Black Walnut block. The cut had stopped in the radiator area so the top is clean but the bottom will have, at worst, a small cut to fill.  I put the blocks back together with the Black Walnut on top. And then spent an hour and a half setting up the band saw to make sure the blade was supported perpendicular to the table.  Afterwards I made a trial cut on the split end cut from the Black Walnut block.  The blade ran true from top to bottom of the six inch thick block.

With my toes crossed (I needed my fingers to guide the cut) I cut wings off the sides of the block.


Next, swapped the side pieces between the blocks and marked them up for the profile cuts.


Hmm, what does it look like now?


With the 2x4 block side pieces to hold the body square, I cut the sloped front for the radiator on the table saw.

Then finished shaping the front of the wings on the band saw. Cutting a vertical arc from where the wing meets the radiator out and forward to the front of the wing and a horizontal arc from the leading edge of the wing down to in front of the axle hole.  The slope on the inner side of the wings is 51 degrees but my band saw only tilts to 45 degrees.  I made up a tilted table top jig from a left over piece from an old project and a scrap of 2x4.


Lined up the band saw tilt and cut half way through the jig cutting high enough to let the wing pieces tilt as needed.


Taped it down and cut a roughly "D" shaped piece of 3/4" thick softwood to use as a rest for the work piece.


The front cut rotates around the axle hole.  A second pass keeping the work piece touching the support block at the saw blade smooths the cut surface.


I chiseled the points off the sides of the slot for the spare wheels and sanded them with the 1/2" drum sander on the drill press.
   
After some rasp work to take out the saw marks on the body and wings and sanding with 80 grit we have:


Next job will be shaping the top of the bonnet.


Friday, 7 September 2012

Wooden Morgan:1950 DHC - Week 2

This week's work started with taking the 2x4s over to Al's to get them thickness planed so I can glue them together into a block.  While the glue was drying I got to work on the wheels, as I'll need them to check their fit in wheel wells and the spare tire slot.  I want to make those cuts in the Black Walnut block before any car shaping is done. i.e. while the block is still square and easy to line up in the drill press.

From the photographs of flat rad drop head coupes I have, I came up with this cross section of a wheel. In the bottom of the picture, the tire is to the left, the brake drum on the upper side, and the hub cap on the bottom.


I then used a Hole & Plug cutter to make several cuts into the wood at significant points of the profiles of each side.  I had room on the board for six wheels so I decided to make six just in case something happened to one.

First cut is the outside of the tire radius, cutting half way through.


Then the same radius cut on the other side, just a quarter way through to make it easy to line up for the final cut to remove the wheel.


Still on the back, I cut the brake drum.  I had to remove the protective cover over the cutting bit to cut this small a circle. Watch out, as the other end of the arm swings in a wide circle!  Fortunately I had just turned off the power when I got my knuckles rapped.


 Cut the line between the tire and the rim.


And some more grooves across the area between rim and brake drum which will be left flat.  Too bad the Plug & Hole cutter bits are not the standard 5/16" square cross section of metal lathe bits.  I could have made a flat cutter to finish the side in one go.


For the front side I reset the tool to the rim radius and cut that first.


Then the deep cut around the central plateau.


Turned the bit to hole cutting, and then cut the out side of the deep part of the profile.


Then up and out a little further towards the rim.


The central plateau was flattened with a 1" Forstner bit.


The board was then flipped over and the outer diameter circle cut until the wheels came loose. Here they are. The upper row shows the back side, the lower row the front.


I then tipped the table top drill press onto its side to make my 'lathe'. See the section on using it in the Morgan Plus 8 model build at:  http://www.morgansportscarclubofcanada.com/images/farmer/page14.php  

I used a cone burr to clear the flat area on the back and to curve the sides of the tires, then a 1/8" ball burr to excavate the profile on the front, and finally the tiny ball burr to remove the remaining tool marks from the plug & hole tool and to make the tread marks. As soon as each side was shaped I sanded it using grits from 80 through to 280.

When all the wheels were done I gave Al a call, he was free so I took the Black Walnut block and the glued 2x4 block over for final dimensioning to 3" thick and 5 3/8" wide.

Voila!  Here are the wheels on the freshly dimensioned block of Black Walnut.


Change in plans, I've been told that the standard spare tire set-up for a DCH in the early '50s is twin spares like in the photographs I have.


Since I have six wheels I'll modify the plans to twin spare layout.