Remember the log of Hop Hornbeam beside the car in the last picture from week 11? It is now five hub caps, two headlights, and a fog light.
Hoping it would let me shape each hub cap identically, I made a scraper with the hub cap profile.
After Al turned the rest of the Hop Hornbeam work piece to hub cap diameter, we found that the piece, without the tailstock supporting it, wobbled too much to work the end. So rather than turning each hubcap on the lathe then parting it off as planned, I cut six disks off the piece with the aid of the perpendicular magnetic saw guide (One extra for experimentation.) I marked the centre on a face of each one, then drilled a shallow 5/16" hole for the axle on one of them to test if I could turn them on my drill press/lathe. The disk spun with only a slight wobble ( the centre holes were all off by a 32nd) The scraper proved hopeless for shaping the hub caps itself but was handy for checking progress with the Dremel. When the domed part of the hub cap was done, then the scraper was useful to mark the locations of the two grooves around the edge. These marks then guided the tiny spherical burr for cutting the grooves.
With one success I was ready to tackle the rest of them.
On the car they will look like...
I traced the headlight profile on a piece of acrylic and cut out a template.
One last use of Al's lathe to turn one end of the remaining Hop Hornbeam stick down to 3/8" so it will fit my drill press' chuck.
The headlights will need radial holes for a mounting peg that will attach to the cross bar. I made a larger scale version of the jig I used for the handle on the spare tire hold down.
To make a head light, start with using the above jig to drill a 9/64" hole 1/4" back from the end of the work piece down to the centre line of the piece. Then mount the 3/8" end in the chuck of the drill press (on its side) and use the Dremel and the acrylic template to turn it to shape. I used the tip of the cone burr to make a bezel/lens border around the front of each unit. Sand it, then saw off the piece. Repeat. With the small diameter of the place the headlights were parted off it took just a little time with some 80 grit sandpaper to shape the tapered tail on each light housing.
I made mounting pegs from 9/64" Hop Hornbeam dowel I turned in the drill.
I reused the little jig from making the spare tire hold-down to drill a 5/64" hole across one end of each mounting peg to fit the mounting bar. The ends with the hole were rounded over by sanding while the pegs were spun in the electric drill.
Using the top view picture as a guide I glued the mounting pegs onto the 5/64" Hop Hornbeam dowel.
Glue on the lights and the light assembly is ready for Tung Oil.
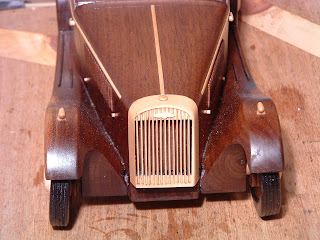
A left over piece of the Hop Hornbeam for the radiator grill bars got turned into a Morgan wings badge.
Here it is with a bit of double sided tape holding it in place.
That is it for the bits to make. Now it is down to applying coats of Tung Oil then assembling it for its coming out party at the MSCCC AGM December 2nd.
Check List Update
Done:
- Cut outlines of the doors and the bonnet.
- Do a wood inlay of some Hop Hornbeam for the bonnet hinge.
- Do a wood inlay of some Hop Hornbeam for the side trim.
- Bonnet louvers
- Trafficators
- Wing scuff guards
- Bonnet catch knobs
- Router off under the wings.
- Round off edges of wings.
- Glue on the wings
- Router off under the wings.
- Round off edges of wings.
- Blacken tires.
- Smooth the line under the wings
- Steering wheel (top that shows above the door)
- Wind screen pillars
- Wind screen frame
- Gas and rad caps
- Door handles
- Parking lights
- Tail lights
- Spare hold down
- Hub caps
- Morgan wings badge for the radiator
- Head lights
In progress:
- Apply Tung Oil finish.
To Do:
- Install wheels, spares, headlights, and badge.


No comments:
Post a Comment